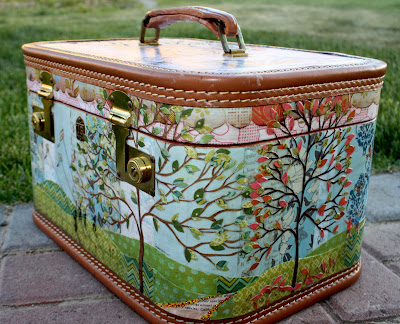
(This is a true demonstration on REAL GENUINE LOVE)
I forgot to take pictures of the trunk I was actually working on before I started, but it was similar to this in size and style.
And I was kind of about 6 hours into it before I started to take pictures at all..
I started by building my background. I used blue strips of paper in the background and applied them to the trunk with Mod Podge... tinted with a little bit of light blue paint.
Why add paint to the Mod?
When working with papers in the same color range that I want to really flow well together, adding just a small amount of paint to the mod adds the exact same base shade to all the papers... so they look like they could have been sold together in a package.
When applying the papers to the trunk:
First, using a broad paint brush, apply a thin to medium coat of mod podge (hereto referred to as "mod") directly to the back side of your paper. Then add a thin coat of mod to the surface of the trunk where you intend to place the paper. Next, place the paper onto the trunk and add a final coat of mod to the front of the paper.
Why add mod to the paper? Why not just mod the trunk surface and stick the paper on?
Paper is a wood based product... and what does wood do when it sits in water? Absorbs and expands. When applying paper to any surface, 90% of air bubbles develop because the paper is absorbing the water out of the paint or mod, and expanding... buckling and wrinking. Applying mod to the paper on its own gives the paper time to expand BEFORE its applied to the surface...of whatever you are applying it to. Way less bubbles, wrinkles, folds... etc, and then... as the paper dries its going to want to shrink back down. It can't because, well it's immersed in drying glue... but what it does is leave a very smooth tight surface.
I worked very carefully around my hardware, as it was not removable.
Holding the paper in place and then using a fingernail or art tool to indent the paper around the shape of the hardware. This creates a template but cutting on the crease lines.
My trees are all hand cut out of paper. Easier than you'd think, just time consuming. On the backside of your paper trace an outline of a tree. Using pointy detail scissors, start at the tips of the branches and begin cutting away the negative space working inward towards the trunk.
If you accidental dismember a tree limb, just remember where it goes and glue it in place.... trust me, no one has to know..
Use mod to glue the tree in place. Start at the trunk and apply mod to small groups of limbs individually rather than attempting to adhere the entire tree in one fell swoop.
On to design:
I have been contemplating in my personal life about why things never seem to get to that perfect "sweet spot" where everything is perfect and you feel so satisfied with everything... and you just feel that way forever...
... and the realization that never happens.
It is the very nature of live to evolve and transform. Each season building on the next. Ever changing. Constantly changing.
A few years ago I started to get very anxious in the fall when the weather started to get cold and the days started to get short. I have this lifetime fear that plagues me that I'm going to end up homeless and that I will die by freezing to death in an alley behind a Chinese food restaurant.
I know this feeling is COMPLETELY 100% reasonable and normal, which is why I just don't fight it.
Anyway, the onset of winter really freaks me out. Once it has been cold for a few weeks I'm totally fine, but initially... yeah, I'm freakin' out.
Summer is of course my favorite season because no one... and I mean no one has ever frozen to death behind a Chinese food restaurant in the middle of the summer. At least not in Boise. In summer, all you have to worry about are dead bodies in the water. (shivers!) but I'll save that idiosyncrasy for another art project. (Well, you are welcome!)
On the lid of my trunk case I hand sketched a tree, and then divided the tree limbs into the four seasons transitioning from spring through winter.
"No winter lasts forever,
no spring skips its turn"
For the better or the worse.. It's going to change.
I shadowed in 4 children flying kites to represent my children, and the connection they have in my life. It is not random chance than placed these specific souls in my care, they are supposed to be my children. Specifically.
Next comes fall and sweaters and beautiful colors... the last hoo-rah of carefree warm days.
And into the frigid, low down, good for nothing, COLD winter. Yup... I'm not a fan.
I did at least try to make winter pretty and enjoyable, and I suppose if I could sit behind a large very thick window in a very well heated room and watch this little scene I may enjoy it. ;)
I did hand piece from paper my little snowman. Closest I'll get to making a real one.

And into spring... and tweeting birds, and love and romance.
This is when I can finally exhale (and begin eating Chinese food again).
The leaves on this tree were made in a typeset fashion, by pressing a leather stamping tool into an ink pad and transferring the ink to the tree, then outlining in black.
Handpainted tulips. xoxo
(or maybe they look more like orchids?)
Little personal Brave Girls Club message...
Texture. I used mod to adhere thread to the trunk for my kite strings. I love the way all the textures play into each other.
Finally coat the entire finished trunk with a layer of mod, tinted very lightly with dark brown paint. Then load it up.
I'm so excited.
You know how sometimes you have a concept in your head, but find actually implementing the idea can prove to be challenging at best?
This was not one of those times. This is exactly what I was going for, and I am in love with my trunk. (and sooo happy!)
xoxo
Cam


27 comments:
Stunning. And so personal. Thank you for sharing. It's beautiful. Oh, and this is Marissa, in case I show up as Julio on here.
Camille, I LOVE this so much and it is absolutely beautiful. I want one.....
Camiile, I LOVE this!! It is absolutely beautiful. I want one....you van bring your trunk to my house anytime.
It is absolutely beautiful!
that is probably one of the most amazing things I have ever seen.
I'm actually a bit gobsmacked and speechless, and you KNOW that's not ME.
I absolutely love your case!!! You did a fantastic job!!! Thanks for sharing!!!
Selenaintx
Oh Cam!!!! This is so beautiful and so touching! You captured your feelings perfectly. I LOVE IT!! You are so talented and I am eternally jealous! :)
Cam - this is so beautiful it brought me to tears! It's incredible!
So Beautiful! And I am very encouraged reading this journey! Thanks so much for sharing- all the details!
Wow! I am in love with it too! What an incredible work of art! You are so very talented Cam! Everything you do is just amazing! Ok, lots of exclamation points but your art blows me away!
Wow Cam, this looks great! You have always been so talented. I love that you transformed this trunk into more than just a beautiful piece to hold your art supplies; you put your soul into and it IS BEAUTIFUL! Thanks for sharing your talent with everyone. I love getting to enjoy it too... and you are welcome to come over and craft with me anytime!!!
Wow! This is so awesome! It is beautiful! You are one talented lady. I always love to check out what you are up to next.
Camille!!! LOve it. Thanks for sharing. I just purchased a case like that at a second hand store but had been stumped on how to change the exterior. Thank you for your inspiration. Your design is gorgeous... you need to sell these. xoxo mikel
Camille, the word "awesome" is just inadequate to describe this creation. Not only is it a gorgeous and meticulously-crafted work of art, it is all YOU, beautiful in every way. It is wonderful to see it finished, and it was thrilling to see it as a work in progress. Love you!!!!
I heart this case and you!! Love Love Love it. You're welcome to come to Omaha with it anytime!
oh my gosh Camille this is beautiful and so meaningful!! Thank you for sharing all the step by step instructions and pictures!!! Wow...love!!!
LOVE LOVE LOVE that trunk!
OMG! This has left me completely and utterly speechless! You are amazing... I don't think I have ever seen such a gorgeous transformation! You go girl!
Hugs from New Hampshire,
Beth P
P.S. I found your blog through the Brave Girl's Club shoppe (I'm doing The Brave Girl Art School in September - I am so psyched!)
Camille...Have I said before how much I love this trunk? I have one just like the blue one in the picture. Now I know what to do with it! Did yours start out with the brown leather trim or did you stain it somehow? Mine is all blue. Did you only paint and mod podge the inside of yours? Mine has that vintage musty smell and I am hoping the mod podge will take that away. Did you really do all of this in one day? All that hand cutting detail ... I love it! I can't imagine getting it done so quickly. I love trees ... so this piece is just amazing to me. Wonderful wonderful.
it's amazing,wonderful,fantastic,adorable,lovely... :)
Hi! Camille! This is STUNNING!!
I’ve just acquired a vintage train case & I’m beginning to plan the restoration. My question is where did you find the storage compartment pieces that you’ve placed inside?
This is great! Would like to use this idea to create bat cave for Xmas for the little boy. I have dark fabrics I can use. Super cool and groovy!
This is beautiful. I hate, and I do mean hate, winter also. God planted me in the he right place, Florida. You need to come on down permentaly! When you do I would invite you over for a play art day!!
This is so 1) pretty 2) creative and 3) inspirational. annnndddddd I get the irrational fears. I worry about being in a public building when gunmen come in and shoot at everyone (do I hide, where are my car keys, etc).
I found this in 2021, and couldn't be more thrilled. I'm the proud owner of several train cases and loved your explanations,story,and your personality. You made me smile and encouraged me to start decorating.
Post a Comment