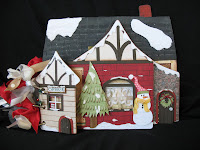
My acrylic house template.
Copyright Camille McClelland 2007.
I am providing this template for personal use only. The design may not be mass manufactured. The design may not be used to teach classes without my express written permission. The design may not be produced for retail sale.
You MAY cut the album and decorate it for your own personal use, or as a gift. You may display the album in your local scrapbook store, PROVIDING the album template be marked "Copyright Camille McClelland 2007." Your finished album may be published, PROVIDING proper credit is established for the album template, and the template is marked "copyright Camille McClelland 2007."


Since the pages of this album are all different sizes it's easiest to cut out 3 or more of each page, resulting in 3 or more finished albums.
The graph paper I have used is marked in 1/4 inch increments, so 4 squares equals 1 inch.
 If you are a first time cutter, you may want to leave the window and door off of the album.
 To cut the door in the first page, cut up both sides of the door then across the top of the door. This cut can be very difficult. If you are having a hard time then sacrifice the door, keeping the rest of the page in good condition, and then use the template and cut a new door from a new piece of acrylic. You will have to work with the two pieces a bit till they fit together nicely. Don't worry about small flaws, as are shown in the picture below, they won't be noticeable when you finish the album.
 You will also notice only the first page has drill holes marked. Drill the holes in page one, and then use the entire page one stack of acrylic as a template to drill the holes in all of the other pages. Place the page one stack on top of the page two stack, aligning the bottom edge and left side of the pages as exactly as possible. Tape the two stacks tightly together. Feed the drill bit threw the drill holes on page one, and continue drilling into page two. You can drill all the way threw the page two stack in this manner, or you can drill just enough to mark the drill spots, and then separate the stacks and finish drilling page two separately.
Repeat for pages three and four.
 To cut out the windows use your drill press to drill a hole in the center of each window pane.
Then feed your scroll saw blade through the hole and complete each cut.

If you feel comfortable enough with your table saw, page three can be cut entirely on the table saw very quickly.


That's it!
If you need detailed instructions on cutting shaped acrylic albums, follow my guide links below.
1. Creating your template
2. Buying your acrylic and preparing to cut
3. Cutting the album
4. Finishing the edges and drilling binder ring holes
5. Separating and cleaning the pages
Still wanna make one, but not so sure on the cutting... check back soon. I am in the process of putting together complete kits including this album, step by step instructions, and all the paper and embellishments pre cut to make the finished gingerbread album. All for just $29.99! If you want to be on the waiting list post comments with your email address.


5 comments:
You are so darn smart in opening this up to the public. Give the companies a run for their money if others can do it themselves.
ok...this is INSANELY CUTE!!! and way to go on the 5K!!! I'm so upset. I wish I could do it with you!
I would like to take this album for $ 29.90. As vai cost to come to Brazil. How should I pay for this album? With credit cards, could be?
Eu gostaria de ter este álbum de U$29,90. Quanto vai custar para vir para o Brasil. Como eu devo pagar por este álbum? Com Cartão de crédito, poderia ser?
Thanks. Obrigada
neusinha fusco
neusinhamf@gmail.com
I would love to be on your list for your acylic album kit!!!
Just wanted to leave you a note. I found this here today and looks very similar to yours.
http://www.overstock.com/Crafts/House-Theme-Acrylic-7x8-Album/3128121/product.html#moreinfo
Post a Comment